Appearance
Add a New Item Animation Layer
This tutorial walks through extending Lyra's modular animation system to implement holding a new item for your character. Motion uses the same animation system as the Lyra Sample Game.
You'll create a child animation blueprint for the item, wire it into the logic that equips it, and verify smooth transitions when equipping it in Motion.
Motion builds on Lyra's animation layer structure. Each holdable item can have its own locomotion poses and aim offsets while reusing shared logic from ABP_ItemAnimLayersBase.
Preview
Motion's local first-person item presentation path is currently in Preview.
For the current runtime setup, use a MotionFirstPersonItemConfig asset to choose the presentation actor, linked layer, attach socket, and saved transform for each item. See First-Person Item Configs.
Prerequisites
- Familiarity with Unreal Engine's Animation Blueprint system
- A system, or atleast a plan, on how you intend to manage the state of which item is currently being held. (i.e. Inventory System or Gameplay Abilties)
Overview
- Duplicate
ABP_UnarmedAnimLayersor create a child blueprint ofABP_ItemAnimLayersBase, the base item animation layer, to create a child blueprint for your new item. - Assign item-specific animation assets (blend spaces, pose assets, aim offsets) to the exposed variables.
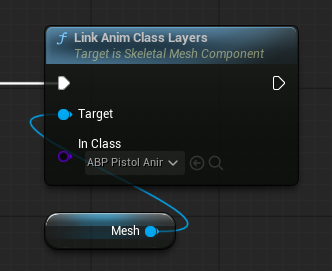
- Call "Link Anim Class Layers" in your blueprint or gameplay ability to switch to the new animation set.
- Validate transitions, inertial blending, and hand placement in-game.
Step 1: Create the Item Animation Layer Blueprint
- In the Content Browser, locate
ABP_ItemAnimLayersBaseinPlugins/MotionCore Content/EpicGames/Characters/Heroes/Mannequin/Animations/LinkedLayers. - Create a child blueprint and rename the copy to match your item (for example,
ABP_ShotgunAnimLayers).
The base class already contains locomotion graphs, additive pose logic, and inertialization nodes. Inheriting preserves these and keeps your changes focused on data overrides.
Step 2: Assign Item-Specific Anim Assets
Motion ships with Lyra's pistol animations as a reference. Use these to follow this guide if you don't have fitting animations yet.
- Open your new
ABP_*AnimLayersblueprint. - In the Details panel, locate the exposed variables for animations.
- Point each variable to the correct animation sequence or blend space for your item.
If unsure which animation goes where, check ABP_UnarmedAnimLayers in Plugins/MotionCore Content/EpicGames/Characters/Heroes/Mannequin/Animations/Locomotion/Unarmed/. Match the variable names with the pistol animations or examine what each animation does.
Step 3: Customize Per-Item Logic (Optional)
- Socket Adjustments: Update the weapon's hand sockets (weapon_l and weapon_r) or add socket offsets in your item implementation to offset grips.
- Unique State Machines: For radically different items (bows, shields, tools), implement (i.e. FullBody_Aiming) and / or extend the graph sections dedicated to aiming and additive layers.
Lyra's base blueprint pipes each linked layer through Inertialization in the main animation blueprint. Keep that node in place so swapping items during equip montages remains smooth.
Step 4: Update Motion's Equip Logic
- Locate the ability, component, or blueprint that equips the item.
- Create or update a
MotionFirstPersonItemConfigasset for the item. - Set the config asset's
LinkedLayerClassto your newABP_*AnimLayersblueprint. - Set that config as the active first-person item config when the item becomes active.
- Play equip and unequip montages so the new layer blends in during the transition.
No Item System
Motion does not ship with inventory or gameplay equip semantics. You must still decide when an item becomes active.
Motion does ship a local first-person presentation layer through MotionFirstPersonItemConfig, so you do not need to hard-wire local presentation actor, linked layer, socket, and framing setup yourself. See First-Person Item Configs.
Step 5: Test In-Game
- Launch the project and equip the item using your Gameplay Ability or inventory system.
- Watch the transition as the equip montage plays. Pose snapping indicates missing blend settings or incompatible poses.
- Walk, sprint, jump, and crouch to confirm all locomotion states use the new animation assets.
- Adjust sockets or additive poses if required.
Troubleshooting
- Animations Not Updating: Make sure the active
MotionFirstPersonItemConfigpoints to your new linked layer class when the item becomes active. - Different Skeletons: Use Unreal's retargeting tools so your new animation assets match the character rig.